I decided to be spunky and make some green tea cupcakes. I am not a big fan of green tea itself but I absolutely LOVE green tea ice cream!!!!! <3<3<3<3 So I thought I'd give this recipe a try.
The site I got it from was: http://www.cookiesncandy.com/tag/recipes/
Sites pic:
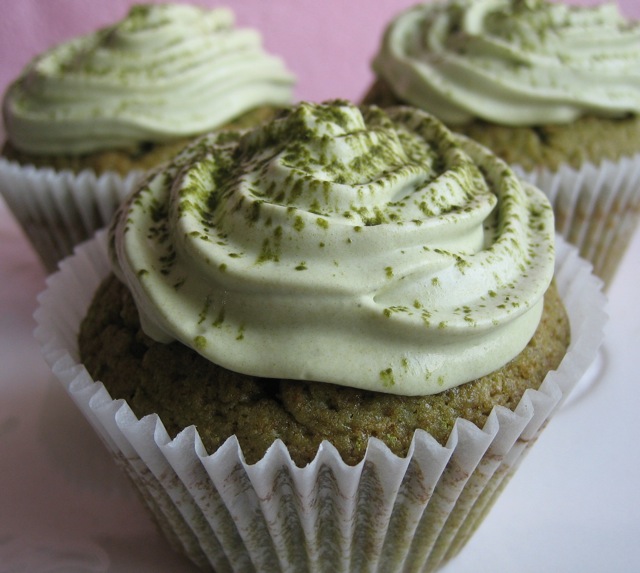
My pic:

Ingredients:Batter
• 1 cup all-purpose flour
• 1 cup cake flour
• 4 teaspoons matcha powder
• 1 teaspoon baking soda
• 1 teaspoon salt
• 1 1/4 cups white sugar
• 1 cup vegetable oil
• 3 eggs
• 1 1/2 teaspoon vanilla extract
• 1 cup sour cream
• 1 cup cake flour
• 4 teaspoons matcha powder
• 1 teaspoon baking soda
• 1 teaspoon salt
• 1 1/4 cups white sugar
• 1 cup vegetable oil
• 3 eggs
• 1 1/2 teaspoon vanilla extract
• 1 cup sour cream
Icing:
• 2 1/2 cups confectioners’ sugar
• 4 teaspoons matcha powder
• 6 ounces cream cheese, softened
• 4 tablespoons butter, softened
• 1 teaspoon vanilla extract
• 4 teaspoons matcha powder
• 6 ounces cream cheese, softened
• 4 tablespoons butter, softened
• 1 teaspoon vanilla extract
Directions:
1. Preheat the oven to 350 degrees F (325 degrees F with convection). Place muffin liners in a mini muffin tin and a regular muffin tin.
2. In a medium-sized bowl, sift together all purpose flour, cake flour, matcha powder, baking soda, and salt. Set aside.
3. In a large bowl, beat together sugar, oil, eggs, and vanilla.
4. Alternating between dry mix and sour cream, stir into the wet mixture until just combined. Cool looking batter huh?
5. Fill the cups 2/3s full with batter.
6. Bake for 15 minutes, or until a toothpick comes out clean.
7. To make frosting, sift together confectioners sugar and matcha powder. Set aside. Using a heavy duty mixer on medium speed, beat together, cream cheese, butter and vanilla for 5 minutes. Reduce to low speed and add sugar/matcha mix.
8.Frost with piping bag.
Now let me tell you the matcha powder was such a mission to find!! I finally had to go to a Chinese Herb store to purchase it and it is quite expensive. I also read on the internet that you can just purchase green tea leaves and crush them until they are a fine powder, but I decided to try and find it first. Mmmmm the match powder smells SOO goood!! It reminded me of green tea ice cream! <3<3<3
The batter of the recipe turned out quite lovely! I really did enjoy it but it isn't THAT sweet so you need the icing to be sweet to balance the recipe out. Also as you can tell the difference between the pics, they obviously added green food colouring to the batter since it is ALOT more greener than mine ( I followed the exact amounts). So if you want your cupcakes to look that green, I would suggest adding 1-2 tsps of green food colouring.
The icing on the other hand had TOO much green tea taste for my liking, so I added some orange zest and that made it just PERFECT. If you are not a big fan of the taste, I would suggest to add the orange zest ( YOU WONT REGRET IT!! :) )